Monday, May 27, 2013

A Thunder Snow Storm?

I think it is almost June but I'm not really sure. I don't think Mother Nature is sure either. Saturday night Kara asked me if we should bring the vegetable plants in because it was snowing. Not too long after bringing the plants in (glad I hadn't planted them yet!), there was a big flash of lightening and the boom of thunder and it was still snowing. Before I went to bed, I took a picture of my car with the snow on it.


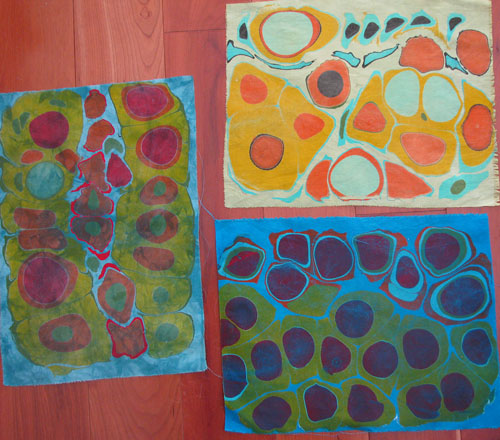
Haven't had a lot of time to work on much. I did take an old piece of styrofoam insulation and make a design wall and  2 printing surfaces. I also took an old sheer curtain and make a screen for screen printing. I've wanted to try screen printing for a while and the class with Elizabeth Barton pushed me to try it. This was my first attempt at screen printing with thickened dye. I cut a stencil from copy paper to use. This piece isn't great but I can see lots of potential. This could be addictive.
On the bottom right side, when I was finished, I took the paper off the screen and layed it the fabric to get a print. This was something I saw Kerr Grabowski do on her Quilting Arts dvd.

I do have a few other things to show. I just have to take pictures. We  now have to get ready for Alex's high school graduation. Then graduations should be over with for a couple of years. Have a lot of cleaning to do which is hard since I'd much rather be playing with fabric, paint and dye and stuff.

Sunday, May 12, 2013

Updated Shibori Quilt

I decided to go ahead and add the 2 rows to the shibori  quilt I made for Elizabeth Barton's class at Quilt University. I like the way it came out. The longer I stare at it I find more visual patterns in it. It's given me more ideas for some shibori quilts. Just need to dye some more fabric!


We are back from Kara's graduation. It was nice. The weather was a little gray and chilly but we had a nice visit with Gary's family while we were there. Kara had fun getting together with all her friends before they all went in different directions. Now to just get through Alex's high school graduation in a month.

Wednesday, May 08, 2013

Shibori Quilt Top


Here's the top I made with the shibori fabrics I made in Elizabeth Barton's class. I'm thinking of adding another row at the top and bottom of this. Maybe, maybe not. We'll see.
Tomorrow Gary and I are off to Houghton, NY for Kara's college graduation. Not looking forward to the 10 hour drive there and back. Kara flew out Sunday to be able to do some of the senior activities that are going on this week and spend some more time with her friends before they head off in different directions.


Wednesday, May 01, 2013

More Fabrics from Elizabeth's Class

The second lesson we did was color dyeing. I tried my hand at making browns from blue, red and yellow. I saw some pieces dyed from these colors in one of my dyeing books and liked the colors.


In lesson 3, we moved onto shibori. 


The next 2 pieces were wrapped diagonally on a pvc pipe and scrunched down.


This piece reminds me of tree branches.


This was the blue/green  piece above, I over-dyed it with turquoise. I like the way this came out. 


This piece was wrapped on a bigger pvc pipe and wrapped with string as I scrunched it. I dyed it with fuschia and green. The green was made from basic blue and sun yellow.  I love the way this came out. I also did a run of fabric using these colors. Just waiting to get them rinsed out, washed and dried.

Now to figure out how I am actually going to use these!

Tuesday, April 30, 2013

Class with Elizabeth Barton

I'm taking a class on Quilt University with Elizabeth Barton. It's called Dyeing to Quilt. It is sad that Quilt University will be closing down at the end of the year. With Carol Millers death, there is no one to run it so this will be it's last year. I'm glad I had signed up for this class. 

Some of the basic dyeing stuff I'm already familiar with. In the first lesson, we did a gray gradation to study value. I've never really done a value study and never made a quilt with blacks and grays. 


I decided to use this drawing that I made years ago after a class with Rosalie Dace called "Up Close and Personal". It was part of a word done in calligraphy. I really was drawn to the curves in it and the play of positive and negative space.  Even though I liked it a lot, I never did anything with it till now. I'd always turn to it  in my idea notebook but didn't really know what I wanted to do. For Elizabeth's class, I did for different value drawings. This is just one of them.


This is what the quilt ended up looking like.  I decided to go with an off center spiral for the quilting to echo the curves in the design.  I would like to keep going with this idea and use it for more value studies and also color studies.


I'm also excited that the classes for next years North Country Studio Workshops is up on  their site. I'm looking at the Quilting class with Cynthia Corbin and the Surface Design class with Jason Pollen. Both would take me out of my comfort zone and push me. Because Jason's class isn't just a "quilting" class, I would have to push myself more and be more out of my comfort zone. I've never really taken a class that wasn't a quilt class. Last years class at NCSW was the first class I'd ever taken that wasn't at a quilt show or workshop. I really enjoyed seeing all the other art that was being done. Elin Noble is teaching the Fiber class there but I really don't need to learn a new technique. It's a natural dyeing class and at this point in my life,  I don't need to learn something where I need to buy more stuff to work with.
Just need to decide which class I want to put as my first choice and which as my second.

Sunday, March 03, 2013

Didn't Work


I found out that using marbo gum from Pro-Chem doesn't work with Jo Fitsell's marbling technique. When the fabric dried, the marbo gum made a plastic like coating that didn't wash out. I even tried washing it in the washing machine and it still didn't come out. It's flaking off now but the paint is coming off with it. I will be sticking with the methyl cel for this technique. Eventually I should be able to get this off and reuse the fabric or marble on the other side.  I'm glad I didn't try marbo gum first or I might not have tried again with the methyl cel.


                                                     You can see how shiny the coating is.

Thursday, January 24, 2013

Another Day of Marbling

Here are some more marbling pictures. These are ones that I've marbled a second time. I really need to figure out how I'm going to use these. They are so different from what I usually use that it has got me a little bit stuck but they are so fun to make that I keep making more and keep asking what if I try this?? I have more fabric drying to marble later today. I pulled some more commercial fabrics to try and some of my painted hand painted ones.


I was looking at this one oriented vertically and thought it looked like a backbone, my friend, Debbie said a snakeskin.


These are all about 10"x13". The size of a large turkey roasting pan. I'd love to find or make something that is bigger so I can try marbling some bigger pieces.

Sunday, January 20, 2013

Marbling - Day 4


Here are pictures of the marbling I did yesterday. It's interesting how the same color looks different when on a different background color. This first one was done on a piece of green silk. The one with a gray background fabric is also a silk.


These next two were made by splattering the paint on to the methyl cel. The first one was a commercial fabric. I like the way the changes in the background fabric show through the marbling. 


This one was done on a hand-dyed background.


I used the circle stencil for this one. Just wanted to see what it would look like without any other marbling underneath.

Saturday, January 19, 2013

Marbling - Day 3


Here are the marbling results from yesterday. The first two pieces have a second layer of marbling added to them.


This one, I just used black and white paint.


This one had a second layer added to it. You can see the smaller circles in a grid. This was done by floating a foam stencil on top of the methyl cel and using it to keep the paint contained.


This is marbling on organza. Should have layed it on a piece of black fabric so it would show up better.

I did some more marbling tonight after I go home from work. This is really addictive!!! I tried marbling on some commercial fabrics and a couple pieces of silk. They are down on the floor of the basement drying. Not sure what I will make with these. Did I say this was addictive?? Really, really addictive???

Friday, January 18, 2013

Marbling - Day 2

Here's day 2 of marbling. I added more alum to the water I soak the fabric in. I followed Pro Chem's directions and it seems to have worked better. I also used colored fabric instead of white. I think that made a difference in how they look. A couple of them were hand-dyed fabric and you can see the mottling coming through the paint.  The 3 in the first photo, I have close-ups of. The 3 in the second photo I have all set to add a second layer of marbling. Jo Fitsell said she doesn't soak the fabric in alum for the second layer, but I have so much background fabric showing that I decided to soak them in alum just to be safe. I'll probably end up putting a second layer on the first 3 too.


It's interesting how different the paints look on different background fabrics. All of these were marbled with the same paint colors. Well, at least with having Gary down in Boston for another 5 weeks, I don't have to worry about how big a mess I make in the basement experimenting!!! Well, I'm off to the basement to have some more fun!

Tuesday, January 15, 2013

It Worked!!!!

For Christmas, Gary gave me Quilting Arts TV Series 1000. I was really fascinated with the marbling that Jo Fitsell showed. I ended up downloading her Marbled Fabric Surface Design workshop from Quilting Arts and decided I wanted to try it. When I went online to buy carrageenan and  alum, Pro Chemical and Dye didn't carry carrageenan but had methyl cel. Went ahead and ordered that. While I was waiting for it to come, I researched other peoples experience with methyl cel and started to get worried. A lot said it was harder to use than carrageenan and they had trouble getting the paint to float. Forged ahead anyways, mixed up the metyl cel, soaked fabric in alum water, and watered down some Golden Fluid Acrylics. And..... it worked!!!! 
There I am, down in the basement, yelling, "It worked!!! It worked!!! This is so cool!!!!" My kids come running downstairs to see what all the excitement is about. When they see it is paint floating on what looks like water, they give me "the look", roll their eyes and head back upstairs.

Here are the pictures.


I think I didn't have enough alum in the water that the fabric soaked in. The alum is used to make the paint adhere to the fabric better. My colors washed out a little. For my first attempt at marbling, I'm happy. I'll need to experiment a little more. I need to work on my color combinations. My favorite is the black and white one. I also want to try marbling onto colored fabric I did mine on white fabric.

Thursday, January 03, 2013

Happy New Year

I hope every had a merry Christmas and a safe and fun New Years! Ours was quiet and and spent with our family. Working  at a grocery, we worked a lot of it. I haven't had a lot of time to do much and what I did do was for presents, so couldn't show them. Kara's old tie dyed pillowcase finally gave out so I made her a couple of new ones. I dyed them using the ice dyeing method.  Both of these were dyed in the same container but came out completely different.


This first one, I separated the 2 sides of the pillowcase and scrunched them differently. You can see that each side came out different. This was also the top layer in the container.


The second pillowcase, I kept the two sides together and did a rough spiral. you can see that both sides came out pretty much the same. this was on the bottom of the container.